In making a stained glass lampshade, the following is a fundimental guide.
Cutting.
Doing 3D items requires perfect cutting of each piece.
Any errors will become evident when form distortions appear towards the completion of the lamp.
To avoid this, use accurate card templates and trace the shape onto the glass with a spirit felt pen.
Keep in mind that geometric shapes can be top and tailed to save time and glass.
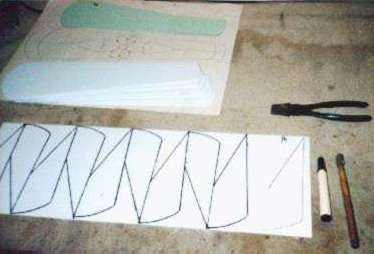
Each piece cut should be checked against the design.
Here you'll see 2 rows of prepared pieces ready for foiling.

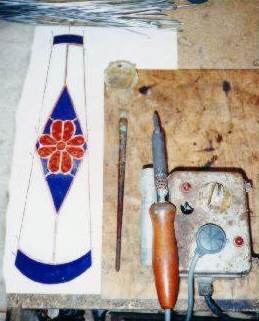
Foiling
The pieces are joined with solder, so to accommodate this, copper is applied to all edges.
The copper comes as a roll of tape. When the paper backing is stripped away by the machine, an adheasive is exposed and
the tape is stuck to the glass edge. A foiling machine is used for this job although this task can be done without this tool.


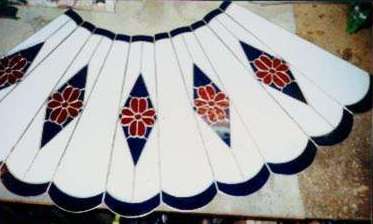
Soldering
Next, the individual panels are set up over the design.
It pays to use a copy of the origional design here. Place the design under a sheet of clear glass and assemble a panel above.
Be sure to position the edges of the glass accurately on the pattern because any shape errors in panels will create a nightmare when you go to assemble the panels into a circle!!
Solder up each panel so that all sections are ready for final construction.
The pic. below shows the set of seperate panels that are nearly ready for assembly into it's conical form.
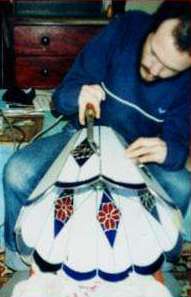
There are several ways to "pull up" the panels into their 3D shape.
I generally I use a jig arrangement with the approach angles set by nails on the bench.
Panels are carefully added one by one until all are present.
Joining the final 2 edges will show how careful you've been as alinement errors will happen here.
Temporary braces of stiff wire may be used to hold the shade firm (as seen below).
Without them this single layer lampshade may colapse during soldering.
Next, solder finishing beads inside then out to create a finished smooth line.
Finally, solder all edges with a good beading,
install the hanger and or lamp spider
then remove all temporary bracing.
Wash the lamp with water and apply copper sulphate solution to all solder work.
Then wash again with hot soapy water.
Lightly polish with a copper cleaner.

BACK TO GLASS INDEX
