This technique of stained glass lamp shade design requires no calculation tables, math's or angle calculations.
With it you can design stained glass lampshades of any spherical regular shape providing your drawing is accurate and done with a sharp pencil..!!!! The lampshade may have any number of panel sides and any number of layers you desire.
It is done with paper & pencil and applies basic tech. drawing skills only.
You'll need paper, a sharp hard pencil, a ruler, a T-square, 45 degree set square, protractor and compass.
I usually draw so that one centimeter on the drawing equates to one inch on the finished lampshade!!
This way, the drawing is of good size on paper and easily converts to the larger scale for template creation.
Prepare a clean sheet of A3 paper orientated to landscape & tape it onto a good square edged drawing board.
On the upper left of the paper, design your lampshade. Start by drawing a side elevation of the design profile for the lampshade you are wanting to build.
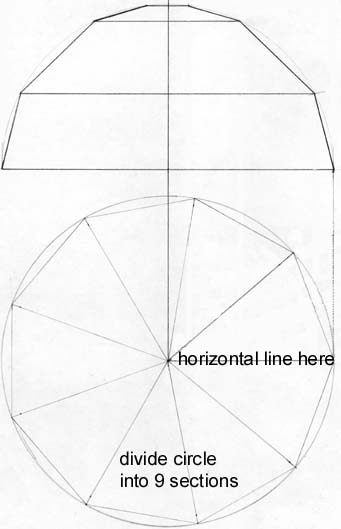
Illustrated here is a 3 layered lampshade that has 9 sides. It's overall dimensions is 16 by 8 inches.

Now below this design drawing, draw in a circle. It must be the same diameter and be aligned with the side elevation drawing. Now draw in a radius line from the circle's centre to the right hand edge of the plan drawing.
Choose the number of sides you wish the lampshade to have (in this example we are going to have 9 sides so it's 360 divided by 9 = 40 degrees) and draw in the radial lines that divides the circle into 9 sections.

Draw vertical lines from the side elevation down to the horizontal line on the right side of the plan drawing. Then with a compass, draw arc's that intersect this horizontal to the next section above.

Now you'll need to draw in an angle bi-section into the working section.

Next draw parallel lines to the bi-section line you've just drawn from each of the intersections you'll find on the working sections. These lines create the widths for your templates.

Observe closely what is seen here and you will understand how this gives the widths you require for each template.
Next draw in a line perpendicular to these parallel lines. Have this new line join the widest pair of parallel lines.
Now with your compass, measure the length of the largest template shape's side and mark this length so that it intersects the next smallest parallel line.
Now draw in another square line on far end then close shape with sides drawn in.

Duplicate this action until all of the shapes are drawn in and defined.
Lastly, measure accurately with a ruler the lengths and widths you now have for each template shape. Measure as centimeters but create the templates in inches. These shapes are then drawn with precision onto a light cardboard then cut out to create your finial templates for cutting the stained glass with.
Below is the full tech. drawing of the procedure.
Providing you draw and measure with total accuracy and your templates are also made with great care, this technique will enable you to design any regular geometric stained glass lampshade you wish to create.

www.karalstudio.com/glass/lampshade-design/stained-glass-lamp-designer.html
to page top
BACK TO GLASS INDEX |

